Tag Archives: cyfin

New User Interface Now Available in CyBlock/Cyfin Release 9.0.4

We are excited to announce the availability of a major release with a redesigned user interface and enhanced functionality in our products – CyBlock Software, CyBlock Appliance, and Cyfin. Some of the highlights of the enhancements are listed below within the new menu structure.

  • Rebranding
    • CyBlock Proxy has been renamed to CyBlock Software, and Cyfin Reporter to Cyfin.
    • Product version numbers have been consolidated, and all products now have the same version number.
  • Logon
    • A more secure logon is available. After logging on with the default password, you will be required to change your password on the Change Your Password screen. If you forget your password, a “Forgot password” link is available to reset your password to the default.
  • Menu Structure
    • Web Management (CyBlock). In this menu, you will find the Filtering features, such as Control Web Categories, Web Content, and Web Search, and Web Blocking Message. Bandwidth Management and the Client Download and Install screen for CyBlock Appliance are also in this menu.
      • You can now customize your blocking message using a Message Editor embedded in the interface. Previously, your HTML file would have to be modified outside the product. A Restore Default button allows you to revert to the Wavecrest default blocking message.
    • Data Management. This menu covers the screens for setting up, viewing, and revalidating log file data. The screens for enabling and configuring settings for the Report Database are in this menu as well as the screens for importing, viewing, and deleting the data.
    • User Management. This menu covers all aspects of managing users including adding groups and IDs, setting up and importing users from Active Directory, importing users from a text file, adding administrator and operator logon accounts, and authentication.
      • The Change Your Password screen lets you change your password at any time and requires your password to meet certain criteria.
    • Categorization. This menu contains all screens associated with the Wavecrest URL List including changing the location, downloading the list, checking the categories of URLs, adding custom categories, and selecting categories to display on reports.
    • Real-Time Monitors (CyBlock). In this menu, you will find the protocol (CyBlock Appliance), Web, and bandwidth monitors.
      • The Real-Time Web Monitor includes new options to display authentication challenge (407) requests and wrapped URLs. The settings and controls are now also available in a toolbar and can be changed while the monitor is gathering data in real time.
    • Reports (CyBlock Software and Cyfin). This menu covers running Dashboard Top and Trend charts, creating different types of reports, and viewing sample reports. The ability to customize or schedule a report has been consolidated with creating a report giving you a streamlined way to manage reports.
      • The Dashboard Top Coached Report is now available in CyBlock Appliance.
    • System Status. This menu covers system information that is intended for administrators’ use, such as server status and information, filter status (CyBlock), job queue, and policy reports.
      • New screens allow you to see array communication messages, dates and times of the URL List and product updates, product event errors and messages, and profiling information. The event and profiling logs are used by Technical Support for troubleshooting purposes.
    • Settings. In this menu, you will find those features that usually require a one-time setup, such as license information, product admin e-mail address, PAC file, SSL certificates, SSL inspection, array setup, memory settings, and report options.
      • (CyBlock Appliance) The Web Redirects screen allows you to redirect HTTP traffic from port 80 to port 8080 and also exclude IP addresses from being redirected.
    • Help.  Along with product documentation, Support screens, and contact information, the Help menu now contains the Category Descriptions and Check for Product Updates screens.

To see the full release notes for your product, visit our Support Web site. You can download the latest release by going to the Administration – Product Update screen in your Cyfin or CyBlock product.

For additional assistance, please contact us.
Viewing Exceeded IDs for Your License

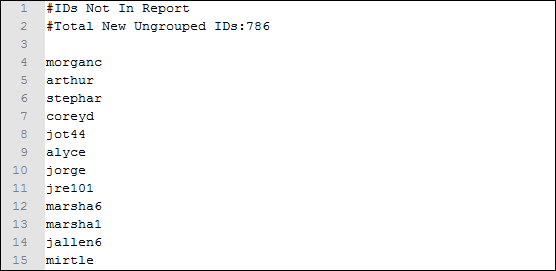
When you run a report and it shows that you have exceeded your license limit, you can determine the reason by viewing the idnir.txt file. The idnir.txt file is generated when your license limit has been exceeded and is located in the …\wc\cf\db folder for Cyfin or the …\wc\cyblock\db folder for CyBlock Software.

The idnir.txt file will show all the IDs that exceeded your license limit and were not in the report you ran.

You can determine whether these IDs are internal users, external IP addresses, or other extraneous types of IDs. Viewing this file will allow you to assess whether you have a logging issue or whether your number of licensed users needs to be increased.

To increase your number of licensed users, please contact Wavecrest Sales toll-free at (877) 442-9346, Ext. 3, or send an e-mail to sales@wavecrest.net.

For additional assistance, please contact Technical Support at (321) 953-5351, Ext. 4 or support@wavecrest.net.

Wavecrest Computing celebrates 16 years

Wavecrest Computing celebrates 16 years of loyal customers who have helped the company become a strong, thriving, and innovative business. “What makes Wavecrest stand out from competitors is the on-going commitment to customers and customer service. When customers call, they talk to a real person and they receive personalized attention every time.” Read more about Wavecrest Computing’s products and history: https://www.globenewswire.com/news-release/2013/10/07/578419/10051153/en/Wavecrest-Computing-Celebrates-16-Years-of-Business.html

How to Properly Configure Windows Server 2012 and Windows Server 2008 R2

Configuring Windows Server 2012 and 2008 R2 to push out a group policy to all users can be challenging with Microsoft’s introduction of Group Policy Preferences. These preferences provide more than 20 Group Policy extensions that increase the number of configurable settings in a Group Policy object (GPO). Within most preference items, the configuration interface looks similar to the applicable user interface for configuring settings so the layout will be familiar. The guidelines to set up users’ browsers with a proxy configuration are alike for Internet Explorer 7, 8, 9, and 10, and the following instructions are for Internet Explorer 10.

  1. Go to Group Policy Management, and select the GPO to which you want to add the Internet Explorer 10 settings.
  2. Edit the GPO.
  3. In the Group Policy Management Editor, go to User Configuration, Preferences, Control Panel Settings, and then Internet Settings. If you have already created settings for Internet Explorer 7, 8, and 9, they will be displayed here.
  4. Right-click in the right-hand pane, select “New,” and then select “Internet Explorer 10.”
  5. In the New Internet Explorer 10 Properties dialog box, click the Connections tab, and then click LAN Settings.
  6. Under Proxy server, select the check box to enable the “Use a proxy server…” option.
  7. In the Address field, enter the IP address of your proxy server, and in the Port field, enter the port number.
  8. Now you need to enable the settings and apply them to all users. You can individually enable and disable underlined settings or settings preceded by a circle within a preference item. The underlining or circle of the setting indicates whether it is currently enabled or disabled.
    • A setting with a solid green underline or a green circle is enabled. The preference extension applies this setting’s value to the user or computer.
    • A setting with a dashed red underline or red circle with a slash is disabled. The preference extension does not apply this setting’s value to the user or computer.
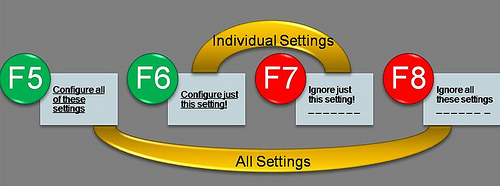
  9. Press the following function keys to enable or disable the settings within a preference item. To select a setting, click the actual text of the setting or its text field.

      • F5 – Enable all settings on the current tab.
      • F6 – Enable the currently selected setting.
      • F7 – Disable the currently selected setting.
      • F8 – Disable all settings on the current tab.

    The following diagram illustrates how the function keys work.

  10. After enabling the settings, select the check box to enable the “Bypass proxy server…” option.
  11. Click OK, Apply, and then OK to save the changes. You will see the Internet Settings entry for Internet Explorer 10 along with Internet Explorer 7, 8, and 9, if they were previously created.

For additional assistance, please contact Technical Support at (321) 953-5351, Ext. 4 or support@wavecrest.net.

Sources:

https://blogs.technet.com/b/grouppolicy/archive/2008/10/13/red-green-gp-preferences-doesn-t-work-even-though-the-policy-applied-and-after-gpupdate-force.aspx

https://technet.microsoft.com/en-us/library/cc754299.aspx

Enhanced Malware Protection

Wavecrest Computing is pleased to announce an enhancement that delivers a tenfold increase in CyBlock’s ability to protect computer networks from malware and Cyfin’s ability to identify increasing security threats. Here is some background information.

Malware is the scourge of the Internet. The term “malware” includes computer viruses, worms, Trojan horses, spyware, adware, and other malicious programs that can disrupt computer operations, gather sensitive information, or gain access to private computer systems. For Wavecrest’s purposes, malware also includes Web sites that support hacking. Most malware originates and is spread from particular Web sites. Unfortunately, many thousands of such sites exist today, and to make matters worse, the number is growing steadily every day at distressingly fast rates.

The malware problem is not new to Wavecrest. For a number of years, companies have been using CyBlock and Cyfin products to protect against and identify automated invasions of malicious scripts and software, and unauthorized access to their internal networks–the two major problems caused by malware. CyBlock provided protection–under customer control–by blocking and reporting on employees’ attempts to visit sites in 3 of more than 70 URL List categories: Hacking, Phishing/Fraud, and Spyware/Malicious.

While this methodology was effective, it was not perfect. The difficulty lay in keeping the URL List up to date in the face of the relentless and rapid increase in the number of malware-spreading sites. This issue has been addressed with an enhancement that significantly improves the ability to keep the list current.

At the same time, three related categories, Hacking, Phishing/Fraud, and Spyware/Malicious, have been consolidated into one called Malware. This consolidation increases the ease of administration for customers.

This enhancement with its improved URL List is included in the latest release of CyBlock v.6.8.0 and Cyfin v.8.8.0. To realize its benefits as soon as possible, it is recommended that you upgrade your CyBlock or Cyfin product as soon as you can. Wavecrest will continue to update the enhanced list daily and make it available for download by customers. The download process remains unchanged.

You can schedule the list to be downloaded automatically every day, or you can download it manually at any time. In any case, as soon as it is downloaded, you will immediately begin to receive the added protection and see a significant reduction in the number of security threats to which you may be exposed.

To download the latest release, go to the Administration – Product Update screen in your CyBlock or Cyfin product. For additional assistance, please contact Technical Support at (321) 953-5351, Ext. 4 or support@wavecrest.net.

Are the URLs in Your Categories Set Correctly?

If you are upgrading your CyBlock or Cyfin product, you will be using the Wavecrest URL List 7. List 7 supports wildcard entries in domain, path, and parameter matching in URLs. In List 6, wildcard entries were possible, but limited, and thus, the URL matching was slightly different. Therefore, we recommend that you recheck and reset the URLs that were added to your standard and custom categories.

To do this, go to the Advanced Settings – Category Setup – Edit URLs screen and select the category you want to change. In the Supplemental URLs or Custom URLs box, modify your URLs according to the List 7 rules. List 7 allows you to use the following wildcard rules to add multiple URLs simultaneously.

  1. Wildcards With Domain Matching.This URL matching method categorizes Web sites whose pages all contain the same type (category) of content, e.g., Shopping, News, and Sports. In these relatively simple cases, one category applies to the entire site. Under this method, if the Web log entries are in any of the following formats, and the URL List contains a matching URL, the product will categorize the visit on the basis of the domain name.
    • www.mydomain.com
    • *.mydomain.com
    • www.mydomain.*
    • *.mydomain.*


    Note:
     For this method to work, and as reflected in the examples, the entry in the URL List must contain a complete domain name element. That is, the domain name between the periods (dots) must be complete and must not be augmented with an asterisk or any other character. For example, the list must not contain mydomain*.com or *mydomain.com.

  2. Wildcards With Domain and Path Matching.This URL matching method categorizes Web site visit-attempts at the path level. This method enables individual pages to be categorized. If the URLs visited (as documented in the Web logs) are in any of the following formats and there is a corresponding entry in the URL List, the product will categorize the visit on the basis of the domain name and path.
    • www.mydomain.com/path/*
    • www.mydomain.com/*/path/*
    • *.mydomain.com/*/path/*
    • *.mydomain.com/path/

    Notes: For this method to work, the entry in the URL List must contain a complete path element. That is, the path element between the forward slashes must be complete and must not be augmented with an asterisk or any other character. For example, the list must not contain /path*/. As indicated at the end of the fourth example above, the asterisk is not always required, i.e., an exact path can be entered. However, as indicated in all four examples, forward slashes are always required.

  3. Wildcards With Parameter Matching.This method adds parameter matching to the two methods defined above (domain alone and domain-plus-path). It focuses more on syntax found in URL parameters than on content of the site being evaluated by the product. The parameter method works as follows. If the Web log entries are in any of the formats listed below, the product will categorize the visit on the basis of (a) the domain name plus the parameter, or (b) domain name plus path and parameter. Note that the first three bullets are examples of the former (no path included).
    • www.mydomain.com/*?keyword=value
    • www.mydomain.com/?keyword=value
    • www.mydomain.com/?id=*
    • www.mydomain.com/?id=*&sr=* (example of multiple pairs)
    • *mydomain.com/*/path/*?id=*

    Notes:  Parameter matching always requires the use of “?”. If a question mark is placed at the end of the domain or the path, the URL List will perform this matching method.The “/” is also required for this method. However the “&” is optional and is only needed when more than one “keyword=value” pairing is involved (as indicated above). Note that the “&” is added between pairs, and the pairs do not have to be in any particular order.

For additional assistance, please contact Technical Support at (321) 953-5351, ext. 4 or support@wavecrest.net.